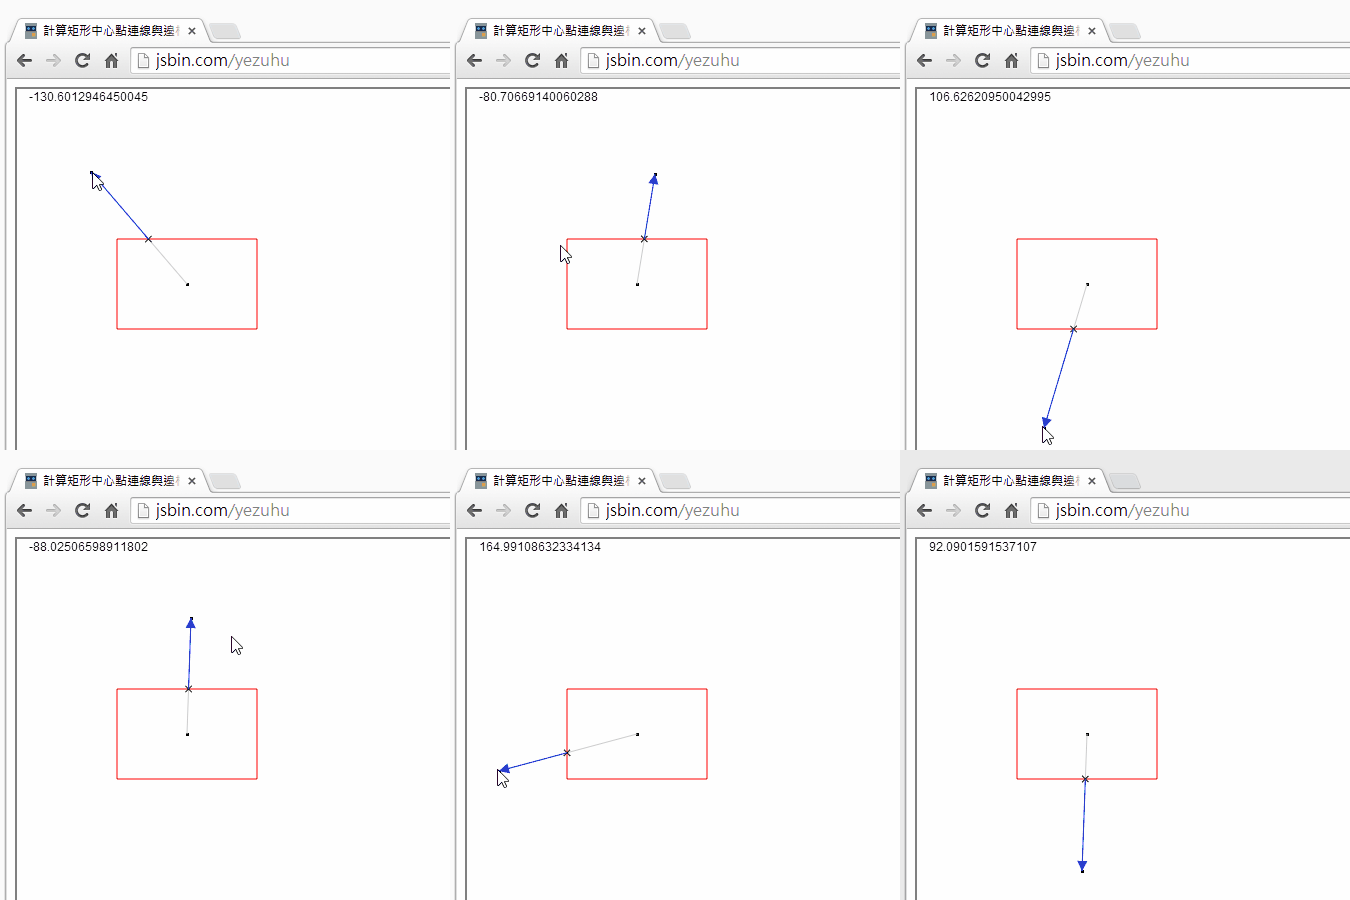
程式寫多了,什麼死人骨頭都可能遇到題材都有機會玩到。最近在寫電子表單流程圖模組,根本是在複習國中數學: sin、cos、兩點距離... 被幾何邏輯搞到昏頭,在草稿紙畫了一堆三角形示意圖還是似懂非懂 orz(數學老師站在我背後,他非常火)
其中有個需求: 用線條連接矩形中心與外部點,但線條需由矩形邊框開始畫起。換句話說,線條在矩形內部的部分隱形,只有與邊框交點到外部點間要畫線。原本已用一堆if else硬幹搞定,但想想還是該用幾何函數解決才會優雅。無奈數學天分不佳,只靠大腦模擬搞不出名堂,心一橫乾脆來寫個繪圖小程式即時顯示計算結果,再依此調整演算法,比全憑抽象思考簡單,適合我這種大腦不夠力的阿呆。測試程式決定用JavaScript寫,順便複習HTML5 Canvas,好個一石二鳥之計。
測試程式成品如下: Online Demo (果然,測試程式剛寫完,演算法也試出來了)

完整程式碼如下:
<!DOCTYPEhtml>
<html>
<head>
<metacharset="utf-8">
<title>計算矩形中心點連線與邊框交點</title>
</head>
<body>
<canvasid="cSketchPad"width="640"height="480"style="border: 2px solid gray"/>
<scriptsrc="//code.jquery.com/jquery-1.11.0.min.js"></script>
<script>
var $canvas = $("#cSketchPad");
var ctx = $canvas[0].getContext("2d");
var box = { x: 100, y: 150, w: 140, h: 90 };var st = { x: box.x + box.w / 2, y: box.y + box.h / 2 };function init() {//清空背景 ctx.fillStyle = "white";ctx.fillRect(0, 0, $canvas.width(), $canvas.height());
//繪製矩形ctx.beginPath();
ctx.rect(box.x, box.y, box.w, box.h);
ctx.strokeStyle = "red"; ctx.stroke();
//繪製中心點 ctx.fillStyle = "black";ctx.fillRect(st.x - 1, st.y - 1, 3, 3);
ctx.save();
}
init();
var ed, pos = $canvas.position(), mx = pos.left, my = pos.top; $canvas.mousedown(function(e) {init();
ed = { x: e.pageX - mx, y: e.pageY - my };//繪製目標點 ctx.fillStyle="black";ctx.fillRect(ed.x - 1, ed.y - 1, 3, 3);
//計算與邊框相交點var pnt = findEdgePoint(st, ed, box.w, box.h); drawLine(st, pnt, "#ccc"); drawCross(pnt, "black");drawLine(pnt, ed, "blue", true);
});
function drawCross(p, c) {var d = 3; drawLine({ x: p.x - d, y: p.y - d }, { x: p.x + d, y: p.y + d }, c); drawLine({ x: p.x + d, y: p.y - d }, { x: p.x - d, y: p.y + d }, c);}
function drawLine(s, e, c, arrow) {ctx.beginPath();
ctx.moveTo(s.x, s.y);
ctx.lineTo(e.x, e.y);
ctx.strokeStyle = c;
ctx.stroke();
//畫箭頭if (arrow) {ctx.save();
ctx.fillStyle = c;
ctx.translate(e.x, e.y);
var ang = Math.atan2(e.y - s.y, e.x - s.x) + Math.PI / 2;ctx.rotate(ang);
ctx.moveTo(0, 0);
ctx.lineTo(-5, 10);
ctx.lineTo(5, 10);
ctx.closePath();
ctx.fill();
ctx.restore();
}
}
Math.sign = function(n) { return n == 0 ? 0 : n / Math.abs(n); }
function findEdgePoint(src, dst, w, h) {var dy = dst.y - src.y;var dx = dst.x - src.x;//計算斜率var ang = Math.atan2(dy, dx);//對角線斜率var a1 = Math.atan2(h, w), a2 = Math.PI - a1;//計算交點到中心的長度var l =(ang >= -a1 && ang <= a1 || ang >= a2 || ang <= -a2 ) ?
Math.sign(dx) * w / Math.cos(ang): //交點在左右側時X軸長度要等於正負w Math.sign(dy) * h / Math.sin(ang); //交點在上下側時Y軸長度要等於正負h//顯示角度(Debug用) ctx.fillText(ang * 180 / Math.PI, 12, 12);
//計算交點座標var tx = src.x + l * Math.cos(ang) / 2;var ty = src.y + l * Math.sin(ang) / 2;return { x: tx, y: ty };}
</script>
</body>
</html>
簡單補充:
- 在使用rect(), moveTo(), lineTo()時,記得一開始先beginPath()宣告為一段新Path,最後用stroke()繪線時,beginPath()之後的整段路徑會塗成同一顏色。
- 箭頭的畫法:
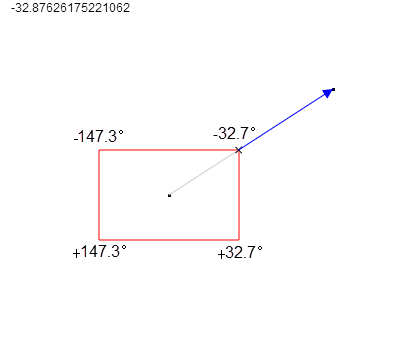
先store()保留沒有位移、旋轉的狀態,用translate()將位置移至線條的末端,之後以(0, 0)為起點用moveTo()、lineTo()、closePath()圍出三角形,並以rotate()旋轉至與線條水平,最後以fill()塗色。完成後記得要restore()取消旋轉及位移,否則再畫其他元素時座標與角度會跑掉。 - 在計算與邊框交點時,需判斷線條觸及上、下、左、右的哪一邊而運算參數不同。我用的方法是找出矩形對角線的四個角度,如下圖中的-32.7、147.3、-147.3、-32.7。當中心與外部點連線的角度介於-32.7與32.7間、小於-147.3,或大於147.3時代表交點在左右側,此時要使 灰線長度 * cos(線條角度) == 矩形寬度的一半,所以灰線長度等於矩形半寬除以cos(線條角度);反之,若交點在上下側,灰線長度要等於矩形半高除以sin(線條角度)。透過這個演算法找出灰線長度,乘上cos及sin就能找出線條與邊框的交點。
![]()
